How to Create a
Music Video
Using Microsoft Windows Movie Maker
By: Angela Jewell
Introduction
Making a music video is easy… if you know what software to use. The most
basic and easiest of these is Windows Movie Maker. Not only is it
user friendly and easy to use, but it’s also free. For people who have no idea
how to make music videos, and are just starting out, WMM is the best choice.
Once you’ve mastered that program, and feel comfortable and confident in your
movie making skills, only then should you try a program that’s a little more
advanced… like Ulead Studies or Adobe Premiere, for example. But be warned:
WMM is the only program that is free.
For this tutorial, I will be
showing you how to make a music video that will cost absolutely nothing. Most,
if not all of these programs, can be downloaded for free off
http://www.download.com, or by doing a
simple Google search on the internet.
Tools and Equipment
In order to create a music video you will need the following (free)
programs:
- A Video File (.AVI, .MPG, .MPEG)
- A Music File (.MP3, .MIDI, .WAV)
- An Empty Folder
- VirtualDub
- Windows Movie Maker
![]() Windows
Movie Maker may already be installed on your computer. First, check under
‘Start’ and then, ‘Programs’. If it’s there, it should be listed by its full
name, with a small movie reel icon ( ) next to it. If
it’s not, do a search for Movie Maker first to make sure it’s not in a
Programs folder on your C drive. If you still can’t find it, then download it
at http://www.download.com.
Windows
Movie Maker may already be installed on your computer. First, check under
‘Start’ and then, ‘Programs’. If it’s there, it should be listed by its full
name, with a small movie reel icon ( ) next to it. If
it’s not, do a search for Movie Maker first to make sure it’s not in a
Programs folder on your C drive. If you still can’t find it, then download it
at http://www.download.com.
Procedure
1.
Create a new folder and place it someplace where it will be
easily assessable.
2. Download VirtualDub for free from http://www.virtualdub.com, and install it.
3. Open VirtualDub, and under the FILE menu, select OPEN VIDEO FILE; then select your video file from the browser window. Once selected, you should be able to play your movie successfully.
4. Once your video is selected, go to the AUDIO menu, and select NO AUDIO: this will eliminate sound.

Figure 1
5. In order to capture certain parts of the video, move the TRACKBAR (1) to the specific scene you want to capture. Then, select the black “MARK IN” button (5), and then press play. Once the TRACKBAR (1) is at the end of the scene that you would like to capture, press the right “MARK OUT” button (6).
6. A blue box should appear, indicating the scene that you have “marked.”
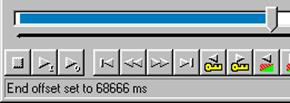
Figure 2
7. Go back to the FILE menu and select PREVIEW OUTPUT FROM START to make sure the capture was successful. If it is, then go back to the FILE menu and choose SAVE AS AVI.
8. In the “save in:” pull-down menu, find the folder you created in STEP 1 and save the file in that folder. Don’t forget to name the file!
9. Repeat steps 5-8 until you have captured all of the files you want for your music video.
10. Open up Microsoft Windows Movie Maker, and go the FILE menu, and choose NEW PROJECT.
11. Go to the FILE menu again and select IMPORT INTO COLLECTIONS…
12. Go to the folder where all the clips you captured using VirtualDub are saved; then highlight all of them and go to IMPORT.
13. Repeat steps 11 and 12 to import the Music File as well: All of the Imported files will appear in the COLLECTIONS AREA.
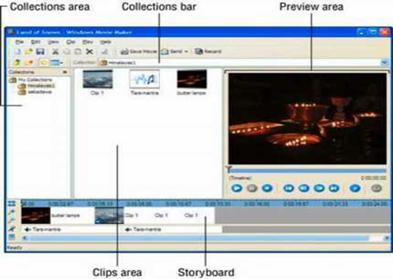
Figure 3
14. Drag the Music File into the Audio/Music section of the STORYBOARD.
15. Begin dragging the various clips from the COLLECTIONS BAR onto the STORYBOARD. Name the project when prompted.
16. Press PLAY to view the video in the PREVIEW AREA.
17. When you’ve matched the music to the videos and are satisfied with the results, go to the FILE menu and choose SAVE MOVIE FILE…
18. Choose the LOCATION where you want to save your movie and click NEXT.
19. Finally, NAME the Movie, and choose a place to save it too, then click NEXT again. Choose the correct MOVIE SETTINGS and click the NEXT button one final time. The program will then save the movie to your specified destination.
20.
Close Microsoft Windows Movie Maker, and watch the music video
you created.
Conclusion
Once you have a basic understanding of how the program works, it will be a
lot easier the second time you go to make a video. There are also many more
special effects and editing options that are available: don’t be afraid to
experiment. If you encounter any problems, just go to the Help Menu and the
answer will most likely be there.